How to build a professional
Scale Model?
You never know how easy it is to restore a 1:1 Mustang until you listen to a
Pro in scale model building. This is Gerry Chevaliers report on how he build
a scale model of the famous Barney Clark Mustang Scale model
"I
started the body modifications by cutting the upper portion of the trunk lid
from the body but leaving the rear edge of the lid and the tulip panel
attached to the roof. I next
used tape as a guide to cut the B pillar at the same angle as the rear
quarter windows and then cutting across the top of the roof joining the two
cuts. I then cut the bottom of
the B pillars from the body. The
B and C pillars were thinned to match the
prototype.
I acquired a junk body that had been badly warped in the kit box, to
use to fill in the missing portion of the stretched roof.
I cut a section of the spare roof and fitted it to the body.I also had to add a section of heavy sheet plastic to the top of the
roof and blend and shape it to avoid a bowed or flat top illusion to the
roof contour.
The drip rail had to be removed from the edge of the B pillar and a
new drip rail made from small strip styrene was glued into place.
The frames for the rear side windows were also made from strip
styrene along with inner framing for the windshield, side windows, and rear
window. The spare roof also
gave up its vent windows that were used for the inner vent windows on the
opposite sides. The roof was
finished off with resin cast sun-visors and 2 dome lights.
Masking tape was
used for the headliner.
Additional body modifications included removing the gas cap from the
rear taillight panel, the 2 engine size emblems, the Mustang badges from the
front fenders and the side scoop trim.A new gas door was scribed into the left rear fender.
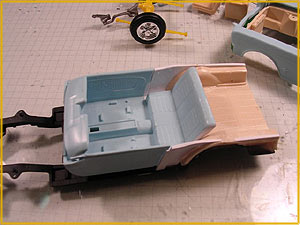
A bed floor and side panels had to be found for the interior.;
I used a resin copy of the bed from the American Muscle Car Posies 55
Ford Custom Wagon.The side
panels and tail gate had to be cut down to fit the reduced height of the
Mustang body but the width and length turned out to be just right.
I cut the Mustang interior bucket at the rear of the door panel
leaving the rear seat intact.
I removed the package shelf along with rear interior side panels as they have
dog legs intended for a convertible. I made new rear side panels and filled
in the rear seat back with a resin seat back from the 55 Wagon.
I made some inside door handles from strip styrene and cast 4 resin
window winders from a 68 Mustang door panel mold.I finished the interior by painting the interior semi gloss black and
detailing with silver and wood toned paints.
I don’t like the promo style chassis that comes with the kit so I
substituted the chassis from the AMT 68 Shelby Mustang kit.This chassis also needs some work.
The rounded (incorrect) inner front fenders needed to be removed.
I lowered the front suspension and made a tie rod and spindle arms to
allow the front wheels to be poseable.
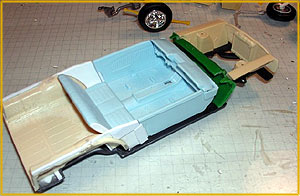
I used a set of MINI EXOTICS inner fender panels and radiator support
panel mated to the kit radiator. I feel that the engine from the kit is too small and doesn’t fill
up the engine bay properly, so I used the engine from the AMT 67 Mustang kit.
This was built box stock with only plug wires added. To finish off
the engine compartment I added a resin Autolite battery and windshield
washer bag.
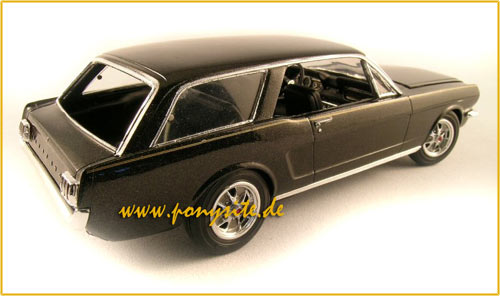
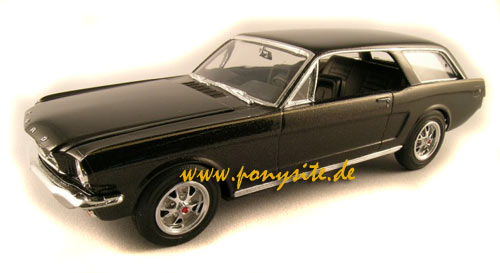
After priming, the body was painted with Plasti Kote black gold
metallic and then it was clear coated and polished. Bare Metal Foil was applied to the trim and photo etched Mustang
letters were applied to the rear panel along with a photo etch lock cylinder
for the tail gate and gas filler door.
Photo etched disks were also used for the rear side window latches.
A gold dual line pin stripe was applied along the upper body.
A plated resin GT grill with fog lights was also used.
Styled steel wheels from AMT 67 Mustang were used with the skinny kit
tires.
After final assembly a coat of the treatment was applied and polished
off.
Gerry Chevalier
Editors note: Thanks for this insight, Gerry. I was never much into scale
model building. Had my brother do it for me and I damaged them mostly, but I
gain more and more respect for this high-end level of car building. There
was a reason, why there was such a close partnership between AMT and Ford
back in the 60ies. There is still reason enough to follow these group of car
enthusiasts these days again.